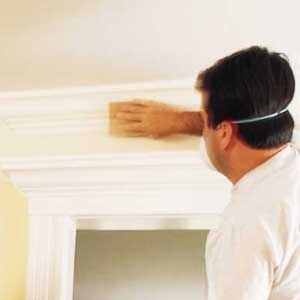
 Even an old lamp with a bare bulb held close to a wall will make minor cracks, bumps or nail pops jump out. Carmen Toto, owner of C. Toto & Sons in Madison, New Jersey, uses painter’s putty or a lightweight spackle for minor cracks and dents; he uses plaster of Paris for dents deeper than 1/8 inch. Instead of the standard tape-and-spackle method for bridging over recurring stress cracks, Maceyunas uses a rubberized spray-on primer called Good-Bye Crack. Damaged wood requires a slightly different approach. “Don’t use spackle on wood,” says Toto, “because it just won’t stick.” For damaged trim, he uses painter’s putty or a two-part wood filler, such as Minwax’s High Performance Filler. Smooth any repairs, bumps, and nibs with a drywall pole sander. For smoother walls and better adhesion, some of our pros sand all previously painted walls regardless of the shape they’re in.
Do the sanding two-step
Sanding not only feathers out chipped paint but also provides “tooth” for the next coat of paint. For glossy trim, use a sanding sponge rather than sandpaper. Sponges mold to the shape of the trim and last longer than paper. When applying latex over alkyd paint or when he is not sure of the original finish, Brian Doherty, a painter in Richmond, Virginia, follows the hand-sanding with liquid sandpaper to make sure the surface is completely deglossed to prevent incompatibility problems. “I’ve seen homes where latex was used on oil-painted trim, and the paint started to peel in less than a year,” says Doherty.
Sponge-bath walls
Unless you like textured walls, don’t paint over dust. Wash the walls with trisodium phosphate (TSP) or a mild cleaner, like Jasco’s TSP No-Rinse Substitute. For smoke-stained walls, Toto uses a 50/50 solution of bleach and water. To clean a wall, use two buckets. Load up your rag or sponge from your cleaning-solution bucket, and scrub. Before redipping, rinse the sponge in a second bucket filled with clean water.
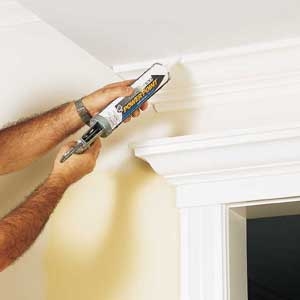
Caulk all cracks
Filling gaps with a paintable acrylic-latex caulk cuts down on drafts and makes your trim look better than new. The secret to using caulk is to cut the tip smaller than you think it should be; too much caulk makes a mess. Also, instead of using a nail to break the inner seal, use a small wire so you don’t stretch out the nozzle. Also consider buying a dripless caulk gun, which will automatically back off the pressure after each pull on the trigger to prevent unwanted oozing.
Use tape — maybe
The pros were split on this tip. “Masking tape is problematic,” says Mark Dixon, a painter in Missoula, Montana, and author of “House Painting Inside and Out” (Taunton Press, 1997). “Paint can bleed behind the tape, or remove the paint it’s stuck to.” Another problem is bridging. “Latex paints form a skin,” says Dixon. “Removing painted tape can tear the skin, resulting in a ragged rather than a sharp line.” Lastly, taping takes time. “Learning how to cut in with a brush takes practice, but if you can do it, you’ll leave most tapers in the dust,” Dixon says. (Cutting in is painting just the surface you want, not the surface adjacent to it — for example, where a wall meets the ceiling.) On the other hand, “If you can’t cut in, you can’t beat tape,” says Span. The pros we spoke with all recommend painter’s (blue) tape because it’s easier to remove than masking tape. To prevent bleeding, Span uses a putty knife to bed the tape. After letting the paint dry, he scores the edge of the tape line with a utility knife to avoid tearing the paint.
 Primers aren’t just diluted paint. They’re formulated to establish a solid, even base, seal stains and ensure that the topcoats of paint go on smoothly and bond securely to the surface. “Most homeowners use latex primers, but the pros stick to alcohol and alkyd primers because they’ll cover almost anything,” says John Weeks, of John the Painter in Mobile, Alabama. Primer can affect the appearance of the topcoat. “It’s okay to spot-prime the ceilings but not the walls, because primed spots will show,” adds Span.
Buy quality paint
In general, glossier paints are more stain-resistant and scrubbable. But a higher sheen also highlights any imperfections in the wall or in the paint job. “Flat paints are fine for ceilings and formal rooms, but for most of my customers, I recommend an eggshell gloss. It’s good for hallways, kids’ rooms, even kitchens and baths,” says Toto. It seems that latex paints have won over even the most finicky painters. “Though we still use oil-based paints for restor-ation work, latex paints are fine for interior walls and new trim,” says Toto, “as long as you don’t go cheap on the paint.” All of our pros have their personal favorites, but they agree that good paint does not come cheap. “You’ll spend $20 to $35 per gallon for a top-shelf paint,” says Weeks. The pros also agreed that using two coats of paint will result in the best-looking job. Don’t skimp on the coverage; if you’re covering more than 400 square feet per gallon, you’re spreading it too thin. Also, keep 1/4 to 1/2 gallon on hand for touch-ups.
Supercharge paint
“Modern paints dry too quickly, and are difficult to brush out,” says Dixon, who uses paint additives, such as Floetrol for latex paints and Penetrol for alkyds. “Adding a few ounces per gallon slows drying time and makes the paint more workable,” he says. Another problem is bridging. “Latex paints form a skin,” says Dixon. “Removing painted tape can tear the skin, resulting in a ragged rather than a sharp line.” Lastly, taping takes time. “Learning how to cut in with a brush takes practice, but if you can do it, you’ll leave most tapers in the dust,” Dixon says. (Cutting in is painting just the surface you want, not the surface adjacent to it — for example, where a wall meets the ceiling.) Although there are mildewcide additives, our pros prefer using bathroom and kitchen paints that have built-in mildew fighters. “These paints will prevent mildew from forming, but they won’t kill mildew that’s already there,” Dixon points out. Because leftover mold spores can live beneath the paint and eventually work their way through to the surface, you should also prep bath and kitchen surfaces. First, wash down the walls with a bleach solution (3/4 cup of bleach per gallon of water) then seal with a stain-blocking primer, such as Zinsser’s Bulls Eye 1-2-3 or Kilz’s Total One.
The perfect roller would hold a roomful of paint, leave the right amount of texture, wouldn’t spray or fuzz, and would be easy to clean. Until somebody invents the ideal one, follow these tips to choose the right roller. “The longer the nap, the more paint the roller will hold, but it will also create more texture.” says Dixon. “A 1/2-inch nap lamb’s-wool roller holds plenty of paint without too much texture,” says Dixon. “Less expensive rollers can work,” says Span. “Just wash them first in dishwashing liquid to remove any stray fibers.” Most of the pros we spoke with prefer 9-inch rollers over 18-inch models — they are lighter, cheaper, and easier to use. Despite these shortcomings, Maceyunas swears by the wider roller. “The roller can do a whole wall in a few up and down strokes instead of in several dozen W and M strokes,” he says.
Use a bucket
Pros prefer 5-gallon buckets with a roller grid to roller pans. They hold more paint than pans and, says Doherty, “It’s tougher to tip over a bucket.” A bucket also lets you box, or mix, two or three cans of paint to avoid color discrepancies. To use a bucket and grid, dip the roller a quarter of the way into the paint and run it over the ramp to work the paint into the nap.
Work with a painter’s rod
A painter’s rod, or pole, can help you paint ceilings more quickly — no climbing up and down ladders required. And there’s no need to stand directly underneath the area you are painting, so you won’t catch every wayward splatter. A pole is also great for walls and floors. The pros were split over whether the 4- or 8-foot pole is best for everyday use, but they all agreed that a telescoping rod is the best bet.
Buy a better brush
A good paintbrush is key to a professional-looking finish. “A quality brush costs $15 to $25, but you’ll discover that pros aren’t as talented as you thought,” says Doherty. “The equipment has a lot to do with their success.” Most of our pros prefer natural-bristle brushes for oil-based paints, but they recommend synthetics for all-around use. When choosing a brush, pay attention to the bristles. Synthetic brushes are made of nylon or polyester, or a combination of the two. Poly bristles are stiffer, which makes them good for exterior or textured work, but for fine interior work, Doherty uses softer nylon brushes. Look also for tapered bristles, which can help you work to an edge, and flagged tips, which help spread the finish smoothly and evenly. Brushes are available in 1- to 4-inch widths. Most painters keep an arsenal on hand to match the job. “Use common sense,” says Maceyunas. “A smaller brush gives you more control, but no one wants to paint a door with a 1-inch-wide brush.” Doherty recommends starting with a 2- or 2-1/2-inch sash brush. The angled brush makes it easier to cut to a line and puts more bristles on the work than a square-tipped brush.
Ideally, you want as much paint on the brush as you can control without making drips or blobs. To do this, Doherty dips his brush about 1 1/2 inches into the paint, then taps (not wipes) each side of the brush against the side of the can. Tapping knocks off the drips and forces the paint into the bristles. “The brush releases the paint just like a fountain pen,” he says. Weeks agrees, saying, “Just be sure to keep your brush moving, or it’ll start to drip.” For more delicate work, such as when you’re painting trim or window sash, you’ll want less paint on the brush. Doherty again dips and taps his brush, but this time he also scrapes the sides against his can. “The outside bristles are drier and easier to manage,” he says, “but there’s still plenty of paint on the brush.”
Cut in close
“Cutting in is an acquired skill, but it’s something you can’t do at all with a ratty brush,” says Doherty. When cutting in on a wall, he loads his brush and spreads out the excess paint, then works the brush up to the line between wall and ceiling. A brush stroke that’s too wide creates a hatband, or smooth brushed band, on the very top of the wall where it meets the ceiling. To avoid this, Dixon recommends rolling first and then cutting in with a brush. “A good roller can get within 1/2 inch of the ceiling,” he says. “You’ll save time by not brushing more then you have to.” When painting baseboards, “a wide taping knife makes a good paint guard,” says Span. “Just keep the blade clean to prevent drips from working around the edge of the knife.”
Work top down
After painting the ceiling, work from the top down: Start with the crown molding, then do the walls and then paint the casement molding around the windows and doors. Do baseboard molding last. “Painting the baseboards last keeps dust and grit from traveling off the floor, onto the brush and then up onto the freshly painted casements,” explains Weeks.
Double-check work
Between coats you’ll want to back-prep, or sand off any bumps, before applying the next coat. Use a light to check the surface for drips, roller flecks, or other imperfections.
Focus on windows
The best time to tackle windows is in the beginning of the day, when you’re fresh,” says Doherty. “But it still takes me an hour to do a standard window.” For double-hungs, begin by raising the inner sash and lowering the outer sash until their positions are almost reversed. Paint the lower half of the outer sash first, then the entire inner sash. Once the lower sash is dry, return both to their normal position, but leave them slightly open. Finish painting the outer sash. “Windows take too long to tape,” says Doherty. When painting, overlap the glass by 1/16 inch to seal the wood.
Do doors right
Most painters have no problem painting doors in place, but they recommend you lay the door on sawhorses and work horizontally. If you have a paneled door, start with the panels and work from the outside edges in toward the center. “Watch the corners — paint loves to puddle,” warns Dixon. While the paint is still wet, lightly “tip off” the panel with an almost dry brush. (Tipping off is pulling the brush over the surface to level out the finish.) When painting the stiles (vertical) and rails (horizontal) just follow the grain of the wood. When the grain changes abruptly, for instance, where the rail meets the stile, don’t stop your brush stroke — you’ll only leave a lump of paint. Apply paint across the joint with a full stroke, and then tip off the overlapping section by pulling the brush in the direction of the grain. “Make sure the door is dry before painting the opposite side or rehanging it,” says Maceyunas.
Skip daily cleaning
Most pros don’t bother cleaning brushes and rollers if they are going to use them the next day on the same job. “Latex paint dries slowly in cold temperatures,” says Maceyunas. For two-day jobs, he wraps the rollers and brushes in plastic grocery bags and sticks them in the refrigerator. “Just allow the roller to return to room temperature before reusing it,” he says. Roller covers are almost impossible to clean thoroughly. Most pros buy new covers for each job.
Expect touch-ups
Accidents happen. Keep a cheap sponge brush on hand to blend a patch with the rest of the wall or woodwork. To mimic the look of a roller, simply dab on the paint.
Source: This Old House


Leave A Comment